<![CDATA[NSHint]]>2024-03-26T00:54:45+01:00http://nshint.github.io/Octopress<![CDATA[Array backwards compatibility using Property Wrappers]]>2020-07-07T14:19:05+02:00http://nshint.github.io/blog/2020/07/07/array-backwards-compatibilityLet’s assume that you’re doing an application which shows your users pretty pictures of seasons. You contact your backend folks and they tell you that the world is simple, there are only three seasons:
The application gets released. Time passes, winter comes and the app gets updated available seasons from the backend:
1
"available":["spring","summer","autumn","winter"]
What happens now? Your functionality breaks.
Since the app can’t understand Season.winter, no seasons get decoded. You receive a lot of bug reports, and your users are not happy ☹️
If only there was something we could do to prevent this from happening..
This seems like a nice use case for property wrappers!
This way, we simply add @IgnoreUnknown before our available seasons and voilà! After that, the available array simply skips the values it cannot understand 🚀
Property Wrappers come with a lot of other great use cases. Please see Properties in Apple documentation for more details 🙂
Hope this blogpost was helpful, thanks for reading!
]]><![CDATA[Complete flows, partial models]]>2019-07-13T19:55:56+02:00http://nshint.github.io/blog/2019/07/13/complete-flows-partial-modelsMost apps these days have a sequence of screens that gather information from the user, like a registration flow, a form of some kind. The data from each step is typically combined into a single data structure.
For example, let’s say we want the name, age, and the password to authenticate the user.
One way to model it is by using the following data structure:
One issue we are going to come about is that our model is strict, it needs all the values at once, whereas users will supply each value at a time. First they will type in their name, then their age, and so on.
Wrapping up the fields in Optional, may loosen its strictness.
One may say, “we can raise an error to the user” or “we could track it and check if users are getting stuck somehow”. But, at the end of the day, this is not a good solution because you know that when the flow ends, you have all the values.
Our model is “lying” to us. That’s not loosen, it’s just flawed.
There are several approaches to make it better, like “one model per step”:
That’s better! But there is also another way of doing things that doesn’t involve duplication nor partial data structs.
Instead of breaking down our data structure, why not to break down functions?
Our FormData initializer, when interpreted as a function, has this shape:
1
(String,Int,String)->FormData
But we can break it down into plain old lambdas1, and by applying it to the initializer for our data structure:
1
(String)->(Int)->(String)->FormData
This technique is called currying. What it does is, it allow us to translate the evaluation of a function that takes multiple arguments into evaluating a sequence of functions, each with a single argument.
The function above goes from a function that takes multiple arguments (A, B, C) and produces a D, to single functions, that take one argument each: (A) -> (B) -> (C) and produces a D, making it possible to partially apply each argument, one at the time, until it can evaluate and return the output value.
Using it in our flow, may look like the following:
I’ve added a few type aliases just to make it more readable.
Cleaning up them further, we’ll have:
123
typealiasFromThirdStep=FormData// just to be explicittypealiasFromSecondStep=(Password)->FromThirdSteptypealiasFromFirstStep=(Age)->FromSecondStep
If you ask me, this is much better because we didn’t have to write anything else, other than the curry2 function itself, which can be used in other places.
]]><![CDATA[Testing Codable]]>2019-05-10T19:55:56+02:00http://nshint.github.io/blog/2019/05/10/testing-codableCodable is a great protocol available in Swift. It makes it possible to create a type safe JSON representations of structures used within our application with zero boilerplate.
Once the structure conforms to Codable everything works out of the box. There’s a nice way to test those structures and make sure that everything gets the exact JSON format that we aligned with backend.
Let’s create the following protocol in the test bundle:
What do you think about this method? Is there anything which could be improved in this implementation? Please let us know :)
]]><![CDATA[Testing the camera on the simulator]]>2019-04-08T22:36:49+02:00http://nshint.github.io/blog/2019/04/08/testing-the-camera-on-the-simulatorTesting code often demands faking the “real world”. IoC plays a huge role in here where you flip the dependency from a concrete implementation to an interface.
This technique is very useful when you want to abstract away third-party code (think UserDefaults), but there are instances where this is not enough. That’s the case when working with the camera.
On iOS, to use the camera, one has to use the machinery that comes with AVFoundation.
Although you can use protocols to generalize the real objects, at some point, you are going to stumble upon a dilemma: the simulator doesn’t have a camera, and you can’t instantiate the framework classes making the tests (almost) impossible.
What are you talking about?
Let’s start with a very simple program that captures QR Code (I’m skipping lots of boilerplate but if you are looking for a more thorough example, here you have a great article).
When the detection happens, you can compute from framework-provided values, by implementing the following method from AVCaptureMetadataOutputObjectsDelegate. Say we want to exercise our program in a way that we ensure that the CameraOutputDelegate methods are properly called, given what AVFoundation provides.
1234567891011121314151617181920212223242526272829
finalclassCameraOutputSpy:CameraOutputDelegate{varqrCodeReadCalled:Bool?varqrCodePassed:String?varqrCodeFailedCalled:Bool?varqrCodeErrorPassed:CameraError?funcqrCode(readcode:String){qrCodeReadCalled=trueqrCodePassed=code}funcqrCode(failederror:CameraError){qrCodeFailedCalled=trueqrCodeErrorPassed=error}}letdelegate=CameraOutputSpy()letcamera=Camera(session:AVCaptureSession(),metadataOutput:AVCaptureMetadataOutput(),delegate:delegate)camera.metadataOutput(AVCaptureMetadataOutput(),didOutput:[AVMetadataMachineReadableCodeObject()],// error: 'init()' is unavailablefrom:AVCaptureConnection()//error: 'init()' is unavailable)
Waat!?
The problem here is that all of these classes are concrete, so we can’t abstract them into an interface. Also they are supposed to be created and populated at runtime, hence you can’t init them.
🍸 Swizzle to the rescue
One possible solution for this kind of scenario (since the framework it’s all Objective-C…for now at least), is to use the Objective-C runtime shenanigans to “fill this gap”.
This is only possible because in Objective-C the method to call when a message is sent to an object is resolved at runtime.
I’m not going to lay down the nitty-gritty details about how it works, but the main idea (for the sake of this example) is to, at runtime, copy the implementation of NSObject.init and exchange it with some new fake init we are going to create.
Now, we can create a fake QR code payload in our tests and check if your implementation of AVCaptureMetadataOutputObjectsDelegate does what you expect it to.
123456789101112131415161718192021222324
letdelegate=CameraOutputSpy()letcamera=Camera(session:AVCaptureSession(),metadataOutput:AVCaptureMetadataOutput(),delegate:delegate)camera.metadataOutput(QRMetadataOutputFake(),// plain ol' subclass, not really importantdidOutput:[FakeMachineReadableCodeObject.createFake(code:"interleaved2of5 value",type:.interleaved2of5)!FakeMachineReadableCodeObject.createFake(code:"QR code value",type:.qr)!],from:AVCaptureConnection(inputPorts:[],output:AVCaptureOutput.createFake!// Another swizzle))XCTAssertEqual(delegate.qrCodeReadCalled,true)XCTAssertEqual(delegate.qrCodePassed,"QR code value")XCTAssertNil(delegate.qrCodeFailedCalled)XCTAssertNil(delegate.qrCodeErrorPassed)
As you can see, you can also check if your sut handles just QR code.
You can use this technique along side with other collaborators, like AVCaptureDevice, AVCaptureInput and AVCaptureOutput.
]]><![CDATA[Wrapping API's using the Builder Pattern]]>2016-05-02T22:36:49+02:00http://nshint.github.io/blog/2016/05/02/wrapping-apis-using-the-builder-patternThe way I was introduced to the Design Patterns lead me to think that those clever and neat solutions were meant to be used just in big softwares solutions. I never considered using them into the small pieces of software. What do I mean by that? Please, read on.
The Builder Pattern if defined as follows:
Separate the construction of a complex object from its representation so that the same construction process can create different representations.
Now, consider for a while the creation of an UIAlertView in iOS.
1
letalert=UIAlertView(title:"Question",message:"Do you like apples?",delegate:self,cancelButtonTitle:"I hate it!",otherButtonTitles:"Yes, I do!","More of less")
This is a long method call, right? But really, that’s not the problem. The problem here is that our class has to conform to UIAlertViewDelegate in order to receive the alert result. Wouldn’t be nicer to have that logic encapsulated? Well, go back and read the definition for the builder pattern, it fits like a glove, am I right?
An idea on how to wrap the builder pattern around the UIAlertView class is as above:
Now, all that is necessary to use create an alert is:
123456
alert.title("Question").message("Do you like apples?").buttonTitles("Yes, I do!","More of less","I hate it!").show{indexinprint(index)}
In the past, I would have used the first approach and lived with that. Of course, showing alerts to the user is a very tiny part of a real work application. But that’s preciselly where I was wrong. This kind of applicability of the builder (among all other design patterns) is what makes software components reusable.
And there are some other places where you could apply the same principle, for example NSAttributedString or UIActionSheet.
I hope you find that useful. Builder to the rescue!
P.S: Yes, yes I know that Apple has released UIAlertController and deprecated both UIAlertView and UIActionSheet. However, the idea is pretty much the same, alothough what Apple did is Factory instead of a Builder.
]]><![CDATA[@noescape attribute]]>2015-10-23T17:00:00+02:00http://nshint.github.io/blog/2015/10/23/noescape-attributeSwift 1.2 introduced us with @noescape attribute. It’s a very important feature, when we want to make our code more cleaner and stricter. Using it properly at 3am will prevent many unwanted retain cycles.
While digging into release notes we can see a bunch of clever words:
A new @noescape attribute may be used on closure parameters to functions. This indicates that the parameter is only ever called (or passed as an @noescape parameter in a call), which means that it cannot outlive the lifetime of the call. This enables some minor performance optimizations, but more importantly disables the self. requirement in closure arguments.
Lets analyze those smart statements and put it into code so everyone can enjoy it:
It’s important to point out, that closures (and functions) annotated with @noescape can only be passed as @noescape parameters. What this mean is:
we cannot run it asynchronously:
we can’t store it
we can’t capture it in another non-@noescape closure
Last to mention, in the future releases this will be taken even further:
This enables control-flow-like functions to be more transparent about their behavior. In a future beta, the standard library will adopt this attribute in functions like autoreleasepool().
]]><![CDATA[Working with CFunction pointers in Swift]]>2015-10-10T11:03:46+02:00http://nshint.github.io/blog/2015/10/10/working-with-cfunction-pointers-in-swiftSwift like objC allow us to mix it with other languages, unfotunately when it comes to Swift we can only choose between our good old friend objC or ANIS C, as there is still lack of C++ support. Basically using function pointers allows us to call C functions inside Swift. Swift will automatically convert methods included in Bridge Header into Swift equivalents:
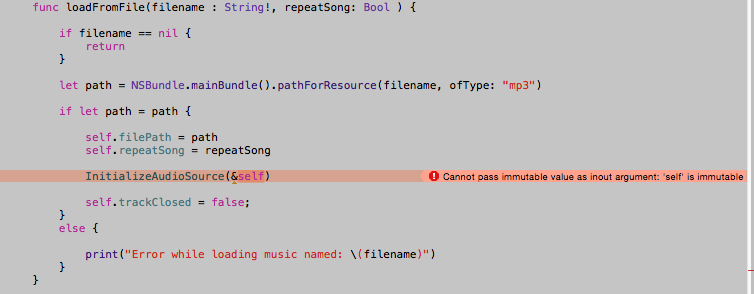
But because Swift is very strict when it comes to type checks we are no more able to pass our class to InitializeAudioSource function, if you try to do so:
1
InitializeAudioSource(&self)
You will end up with this error:
And this is were the bad hacks come in. Unfotunately we need to get a “true” raw pointer to be able to pass it back to C code and to so we need this piece of code:
12345678
//convert self to unmanaged objectletanUnmanaged=Unmanaged<KWSBackgroundStreamPlayer>.passUnretained(self)//get raw data pointerletopaque:COpaquePointer=anUnmanaged.toOpaque()//convert to Mutable to match Swift safe type checkletvoidSelf=UnsafeMutablePointer<Void>(opaque)InitializeAudioSource(voidSelf)
And that’s how you pass Swift classes and objects to C code, and you will need to do it every time you need a void or any other fancy pointer on C side.
What happens here is that we first take an Unmanaged version of our class object this tells compiler that we are now responsible for memory management, and stops doing retain release magic under the hood for us. But still this is not enough, now we need a raw memory pointer from that unmanaged object and thats where toOpaque() comes in. This will return an raw C pointer of our class object. This is the true void * pointer.
COpaquePointer is memory representation of something that cannot be represented in Swift so you should be very careful when playing with this kind of pointers. Now we just need to make it a proper type in this case UnsafeMutablePointer with <Void> class type. Every UnsafePointer have constructor that takes COpaquePointer so you have to be sure you are choosing proper type when creating it as there is no type check at this point!
Hopefully on C side it’s easy to convert void pointer to proper class type, you just need to use bridge to do so:
12345678910111213141516
voidInitializeAudioSource(void*userAudioClass){//bridge it back to our class KWSBackgroundStreamPlayer*backgroundPlayer=(__bridgeKWSBackgroundStreamPlayer*)userAudioClass;//get some propertiesNSString*path=backgroundPlayer.filePath;repeatSong=backgroundPlayer.repeatSong;//... //we can even pass it as parameter with proper pointer typeOSStatusresult=AudioQueueNewOutput(&dataFormat,BufferCallback,(__bridgevoid*)(backgroundPlayer),nil,nil,0,&queue);//... }
I hope this will help people understand a bit more about how danger may be playing with C in Swift and vice versa. Using Unmanaged and COpaquePointer may lead to crashes and memory leaks, as in some cases you are again responsible for manual memory managment, you are able to get raw pointers with no type that can be casted to whatever you want and so on.
Overall this is a powerful magic you can do in Swift but as someone said: “With Great Power Comes Great Responsibility” ;)
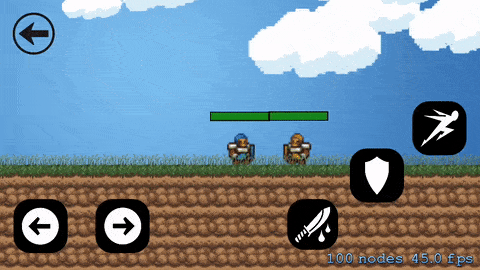
]]><![CDATA[Bluetooth low energy the fun way]]>2015-10-08T18:17:28+02:00http://nshint.github.io/blog/2015/10/08/bluetooth-low-energy-the-fun-wayToday Bluetooth Low Energy can be found in many cool applications, it can be used from simple data exchange to payment terminals and the more popular usage with iBeacons. But what if we want to build something funny with it? Like some simple game not even realtime, it may be even turn based game. Imagine you do not need to go through this long setup, waiting for server players to be ready etc.
Everyone knows that building good multiplayer game is hard, multiplayer itself is hard… But here I want to show you my small proof of concept of working bluetooth low enery multiplayer game.
It can be used in any kind of game! Strategy, board, rpg, race. I built§ a small demo project to show this in details but now let’s focus on basics:
Pros:
It’s simple!
Works with any device
No need to pair, login etc. Just come near other phone
Cons:
Bandwith (approx 30bytes of data per packet which todays is nothing)
Limited distance (work well in approx 20m range)
We have our interface class that will be used to extend functionality on both server and client logic (we use central and peripheral mode of our phone)
As you can see, it’s very simple - one send and one receive method as delegate. As both recive and send arguments, we can get the command used in your game to recognize packet type and data which will come along with this command.
Now we need to implement our server and client logic, i don’t want to describe in details how to setup BluetoothLE on iPhone so insted I will highlight only important methods like receiving and sending packet on both client and server side.
classKWSBluetoothLEClient:KWSBluetoothLEInterface,CBPeripheralManagerDelegate{overridefuncsendCommand(commandcommand:KWSPacketType,data:NSData?){if!interfaceConnected{return}varheader:Int8=command.rawValueletdataToSend:NSMutableData=NSMutableData(bytes:&header,length:sizeof(Int8))ifletdata=data{dataToSend.appendData(data)}ifdataToSend.length>kKWSMaxPacketSize{print("Error data packet to long!")return}self.peripheralManager.updateValue(dataToSend,forCharacteristic:self.readCharacteristic,onSubscribedCentrals:nil)}funcperipheralManager(peripheral:CBPeripheralManager,didReceiveWriteRequestsrequests:[CBATTRequest]){ifrequests.count==0{return;}forreqinrequestsas[CBATTRequest]{letdata:NSData=req.value!letheader:NSData=data.subdataWithRange(NSMakeRange(0,sizeof(Int8)))letremainingVal=data.length-sizeof(Int8)varbody:NSData?=nilifremainingVal>0{body=data.subdataWithRange(NSMakeRange(sizeof(Int8),remainingVal))}letactionValue:UnsafePointer<Int8>=UnsafePointer<Int8>(header.bytes)letaction:KWSPacketType=KWSPacketType(rawValue:actionValue.memory)!self.delegate?.interfaceDidUpdate(interface:self,command:action,data:body)self.peripheralManager.respondToRequest(req,withResult:CBATTError.Success)}}}
classKWSBluetoothLEServer:KWSBluetoothLEInterface,CBCentralManagerDelegate,CBPeripheralDelegate{overridefuncsendCommand(commandcommand:KWSPacketType,data:NSData?){if!interfaceConnected{return}varheader:Int8=command.rawValueletdataToSend:NSMutableData=NSMutableData(bytes:&header,length:sizeof(Int8))ifletdata=data{dataToSend.appendData(data)}ifdataToSend.length>kKWSMaxPacketSize{print("Error data packet to long!")return}ifletdiscoveredPeripheral=self.discoveredPeripheral{discoveredPeripheral.writeValue(dataToSend,forCharacteristic:self.writeCharacteristic,type:.WithResponse)}}funcperipheral(peripheral:CBPeripheral,didUpdateValueForCharacteristiccharacteristic:CBCharacteristic,error:NSError?){ifleterror=error{print("didUpdateValueForCharacteristic error: \(error.localizedDescription)")return}letdata:NSData=characteristic.value!letheader:NSData=data.subdataWithRange(NSMakeRange(0,sizeof(Int8)))letremainingVal=data.length-sizeof(Int8)varbody:NSData?=nilifremainingVal>0{body=data.subdataWithRange(NSMakeRange(sizeof(Int8),remainingVal))}letactionValue:UnsafePointer<Int8>=UnsafePointer<Int8>(header.bytes)letaction:KWSPacketType=KWSPacketType(rawValue:actionValue.memory)!self.delegate?.interfaceDidUpdate(interface:self,command:action,data:body)}}
In both cases sending and reciving is the same:
Sending:
Take raw value of the command
Save into NSData
Append using additional data that comes with the command
Send to peripheral/central
Receive:
Take NSData from central / peripheral (update request status if needed)
Get first byte to recognize command type
Take subset of Data by removing 1st byte and store it as value coming along with command
Take value of header byte and cast it to our PacketType
Send it to delegate
Thanks to that we can build our game logic like this:
//player is dead notify other playerself.communicationInterface!.sendCommand(command:.GameEnd,data:nil)//send some basic data about your player state (life, position)letcurrentPlayer=self.gameScene.selectedPlayervarpacket=syncPacket()packet.healt=currentPlayer!.healtpacket.posx=Float16CompressorCompress(Float32(currentPlayer!.position.x))letpacketData=NSData(bytes:&packet,length:sizeof(syncPacket))self.communicationInterface!.sendCommand(command:.HearBeat,data:packetData)//send some other info letdirectionData=NSData(bytes:¤tPlayer!.movingLeft,length:sizeof(Bool))self.communicationInterface!.sendCommand(command:.MoveDown,data:directionData)
Game works smoothly, there are no lags in connection and you can play almost instantly! And of course it allows you to integrate mutliplayer in your game in few minutes.
If you are starting your journey with gamedev or iOS and plan to build simple SpriteKit game with some basic multiplayer support it may be worth considering this option.
Demo project used to present the mechanics is available as always on github
Game require at least two iPhone 5 to test and play. To start simply open game, one of the players choose server, other one client mode and bring your phone next to each another. Once you do that you should be notified about successfull connection by tone sound.
]]><![CDATA[Easy cast with _ObjectiveCBridgeable]]>2015-10-07T19:15:43+02:00http://nshint.github.io/blog/2015/10/07/easy-cast-with-_ObjectiveCBridgeableSwift is out there for about a year and it’s a great programming language. I think that almost every iOS/OSX developer out there has already written couple of things in Swift (if you haven’t, go ahead and try, you won’t regret it, I promise). Although, we have many years of libs and frameworks built using Objective-C and sooner or later a project may have both Swift and Objective-C working together.
Fortunately, Apple gave us a book and a couple of WWDC session (here and here) with the intent to help developers on this task.
For those who have some experience with this integration knows that casting plays an important role. So, todays hint will dig into an poor documented protocol called _ObjectiveCBridgeable.
The documentation, which is only founded in header files says:
A Swift Array or Dictionary of types conforming to ObjectiveCBridgeable can be passed to Objective-C as an NSArray or NSDictionary, respectively. The elements of the resulting NSArray or NSDictionary will be the result of calling bridgeToObjectiveC on each element of the source container.
Ok, but there is something else you can do with that, which is very handy.
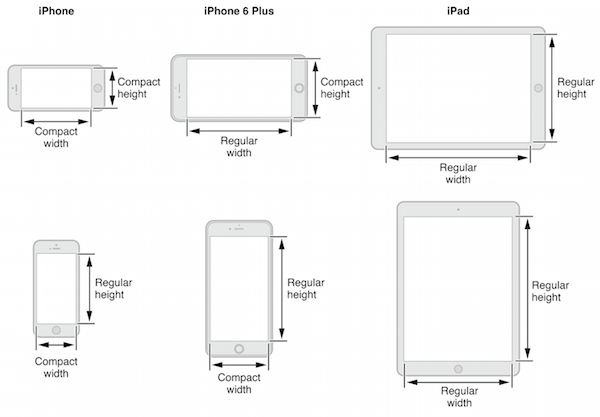
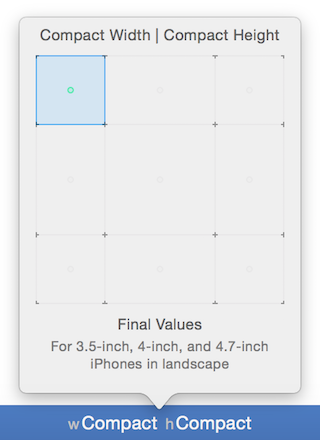
]]><![CDATA[UITraitCollection trick]]>2015-09-23T19:15:43+02:00http://nshint.github.io/blog/2015/09/23/uitraitcollection-trickGone are the days where there was just one iPhone for developers as a target. Now we have to support multiple devices with different screen sizes. Fortunately, we have autolayout, which solves a part of this design equation, the other part is solved with UITraitCollection. Trait collection object has two size classes: horizontal and vertical. Each of these classes has three possible values: compact, regular or any. The current device+orientation can be described as a combination of the sizes.
The best thing is that storyboards and nib files support these size classes. We can make layout changes directly onto them. Every view or auto-layout constraint can exist in one or several other size classes. So it is possible to support multiple devices and orientations without any code. Nevertheless there is a case, which is not covered at all. Imagine that you support only portrait mode and the designer wishes to make a difference between iPhone 5 and iPhone 6+ screen. In this case, size classes are not much helpful. However, we can leverage them in an unusual way.
UITraitEnvironment is a protocol which provides access to trait collection. Its conformed by most of the objects in view hierarchy: UIScreen, UIWindow, UIViewController, UIView. Every child inherits the trait collection object from its parent. The trick is to override the trait collection in UIWindow and return a custom value for iPhone 6+ device. Take a look:
We override trait collection in UIWindow just for iPhone 6+ model. Now we can make layout changes in storyboard directly for this model by changing size class selectors at the bottom of Interface Builder pane. Trait collection with horizontal compact class and vertical compact class is reserved for iPhone 6+.
We can install additional views and change layout constraints only for iPhone 6+.
Tell your designer about that cool hint and you will probably get some treats. The project shown above can be found on GitHub.
]]><![CDATA[Logging excessive blocks on the main thread]]>2015-09-14T01:30:09+02:00http://nshint.github.io/blog/2015/09/14/logging-excessive-blocks-on-the-main-threadLogging excessive blocks on the main thread
Having an application running at 60 FPS is every programmers dream, and users delight.
The worst users experience ever is a frozen and unresponsive screen. It’s a dreadful crime in mobile world nowadays. Users try to interact at any moment and according to Murphy’s law they will find all your mistakes. So, you better keep the main thread slim.
To keep things smoothly in the users interface, every single operation that’s schedule to run into the main thread can take longer than 16 milliseconds, and there’s a handy solution to get you covered. It’s a little library called Watchdog.
Watchdog is a very simple and straightforward library that logs excessive blocking on the main thread. Let’s take a look at how to use it:
1
letwatchdog=Watchdog(0.2)
Just instantiate it with a number of seconds that you want for Watchdog to consider that the main thread blocked. Also don’t forget to retain Watchdog somewhere or it will get released when it goes out of scope. Whenever the main thread is blocked for more than the value previously defined, it will print out logs, just like this:
1
👮Mainthreadwasblockedfor1.25s👮
Pretty nice debugging tool!
]]><![CDATA[Autolayout and NSLocalizedString]]>2015-09-02T20:00:52+02:00http://nshint.github.io/blog/2015/09/02/autolayout-and-nslocalizedstringA localized application is the one that has all of its texts, translated into the users device current language. And this, for us developers, means one thing, and one thing only. Nightmare.
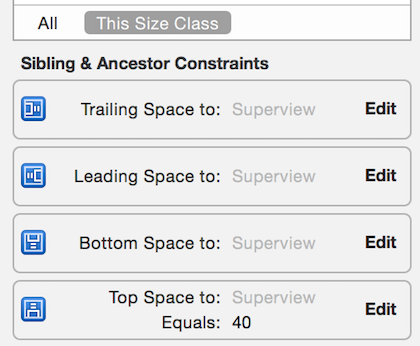
Every time a new translation comes, it’s necessary to run the application and check for broken layouts. Take this quite simple UI.
Simple, huh?
All right, here’s what you have to do to get covered with future translations, and avoid autolayout nightmares.
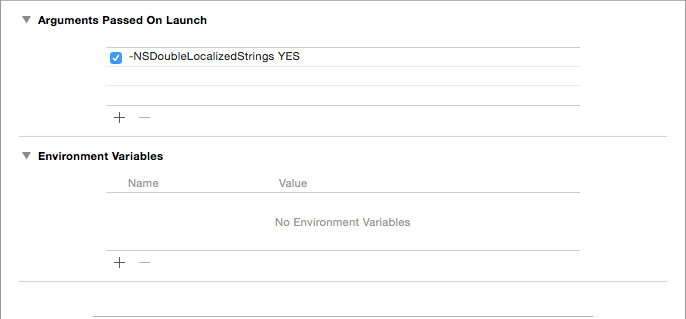
Add -NSDoubleLocalizedStrings YES to Arguments Passed On Launch to the Run section at your Project Schemes.
This argument will duplicate all strings loaded using NSLocalizedString.
What’s better then that? What about finding out unlocalized strings?
So, -NSShowNonLocalizedStrings YES comes to rescue!
Great! Now you go and get yourself a cup of coffee while the translation team does their job :)
]]><![CDATA[Don't forget about UIMottionEffect]]>2015-08-24T20:00:52+02:00http://nshint.github.io/blog/2015/08/24/dont-forget-about-uimotioneffectsUIMotionEffects was first introduced in iOS 7. The WWDC session which presented this, amongst other cool things, is named Implementing Engaging UI on iOS. Nevertheless, UIMotionEffects is still overlooked. But not today, let’s make something cool with it.
Motion effects is an easy way to react to external variations on the device’s orientation. To say, UIKit performs UI changes whenever the user tilts the device, vertically or horizontally.
Let’s use UIInterpolatingMotionEffect a subclass of UIMotionEffects, with MapKit. Notice how appealing it is.
Sweet, right?
Achieving it, is easier than you think. Just a few lines of code and you’re good to go:
Think of minimumRelativeValue and maximumRelativeValue as leading and tralling constraints, respectivily, to its superview.
That’s why you have to create the UIView, MKMapView in this case, outside its superviews bounds. Like so:
As the user tilts the device, UIInterpolatingMotionEffect translates the fixed offset values returned by the system to the range of specified values, then UIKit applies the translated values to any target views.
Don’t forget about this! Details matters and it’s what users love in mobile apps!
]]><![CDATA[Autolayout breakpoints]]>2015-08-17T20:00:52+02:00http://nshint.github.io/blog/2015/08/17/autolayout-breakpointsAuto layout has become a crucial tool for iOS and OS X development. It makes creating layout for multiple screen sizes easy peasy. But sometimes it can drive you crazy, with verbose and misleading logs.
12345678910111213
Unable to simultaneously satisfy constraints.
Probably at least one of the constraints in the following list is one you don't want.
Try this:
(1) look at each constraint and try to figure out which you don't expect;
(2) find the code that added the unwanted constraint or constraints and fix it.
(Note: If you're seeing NSAutoresizingMaskLayoutConstraints that you don't understand, refer to the documentation for the UIView property translatesAutoresizingMaskIntoConstraints)
(...........)
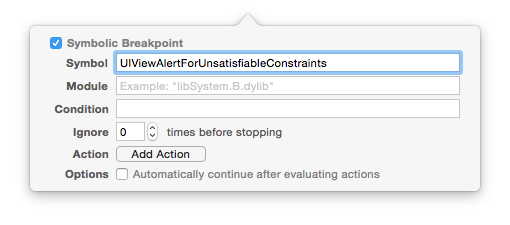
Make a symbolic breakpoint at UIViewAlertForUnsatisfiableConstraints to catch this in the debugger.
The methods in the UIConstraintBasedLayoutDebugging category on UIView listed in <UIKit/UIView.h> may also be helpful.
That’s a huge log! And I cut off the NSLayoutConstraint part. Yet, the second last line is giving a clue in which direction to go to fix this issue. Symbolic breakpoint at UIViewAlertForUnsatisfiableConstraints.
All right, here’s what Xcode want’s you to do:
Honestly, that won’t help much, because basically it’ll just stop the execution and leave you up with LLDB, alone in the dark.
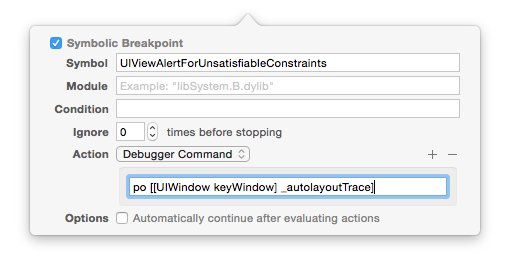
But there’s a little trick you can do to enhance the preceding symbolic breakpoint.
Adding po [[UIWindow keyWindow] _autolayoutTrace] to it (for Obj-C projects) or expr -l objc++ -O -- [[UIWindow keyWindow] _autolayoutTrace] (for Swift projects).
Now, on console, you’ll see all the UIView hierarchy and exactly where it has ambiguity.
Note that as you hit continue it’ll stop at every ambiguous layout you may have.
And if that’s not enough for you to find out your autolayout issue, try changing the view’s color, who knows?
Fear no more young Padawan, make symbolic breakpoints and LLDB work for you!
I would like to thank Porter Hoskins for pointing out the correct LLDB command for Swift.
]]><![CDATA[NSProgressReporting]]>2015-08-09T20:00:52+02:00http://nshint.github.io/blog/2015/08/09/nsprogressreportingIn iOS7 and OS X 10.9 Apple released NSProgess. Its a nice, helpful piece of code that was supposed to make our coding lifes easier.
If you finally find a proper way to use it it can be very beneficial.
Besides of helpfull UserInfo object keys which give us comprehensive text information about progress of our tasks in proper language, NSProgress was supposed to provide us way of compositioning objects into trees. However, first version of class allowed this in an implicit way which does not look very clear first time you learn it.
When applying this approach you have to create child progress using totalUnitCount convenience constructor immediately. You also should document that you support implicit composition in a clear way.
OSX 10.11 and iOS 9.0 provides more explicit way for creating tree structure of NSProgress objects. Things are simple now:
There is also one more thing useful thing in process of forwarding progress through our app architecture. When any of your classes is free to attend in NSProgress family tree, simply implement following protocol:
This way we are able to easily track progress of tree structure of tasks and get our overall progress in an easy, object oriented way.
]]><![CDATA[Using sql as date formatter]]>2015-08-04T20:50:51+02:00http://nshint.github.io/blog/2015/08/04/using-sql-as-date-formatterThis post is a quick update to Vombat’s blog post about using SQL instead of NSDateFormatter when it comes to parsing dates in your project. If you don’t read it yet, I will highly recommend to do it now. This time we will use Swift to make same measurements.
TL;DR:
You can use sql database function strftime to get UNIX time from e.g.: ISO8061 date string.
I did some measurements using iPhone 5S with iOS8.2 in release configuration running exactly same amount of data (One Milion strings with ISO8601 date)
So using SQL to format string into date is pretty fast but acutally slower than objC version (But still at least 10time faster than regular method) So what about Swift?. Nothing really changed, overall results show faster computation but I’m using better CPU so NSDateFormatter is still very very slow… If you like it, sample source code is available on Github
]]><![CDATA[Law Of Demeter]]>2015-08-03T13:24:06+02:00http://nshint.github.io/blog/2015/08/03/law-of-demeterYou may haven’t heard about this law or if you have, you may have wondered who’s this Demeter guy. Regardless of it, the Law Of Demeter (LoD) is a foundation concept that’s used among several design patterns, to wit: Delegate, Proxy, Façade, Adapter and Decorator. Therefore, you probably are already taking advantage of this Law, knowing it or not.
There’s a particular situation that occurs with iOS, that’s perfect for applying the LoD. Sometimes it’s needed to call method in our UIApplicationDelegate. The common way of doing that is the following:
Wrapping up method calls, separating concerns and decoupling classes are the spine of LoD. Some can say that objects become more complex, but one thing is for sure, your software components will be more testable, and that is a big win!
Now go ahead and follow the rule!
]]><![CDATA[Run Script Phase reporting]]>2015-07-23T13:24:06+02:00http://nshint.github.io/blog/2015/07/23/run-script-phase-reportingBash scripts are commonly used in Mac/iOS development to make repetitive operations hands-free. However sometimes things go wrong and in a perfect world I’d like to be properly informed about the errors.
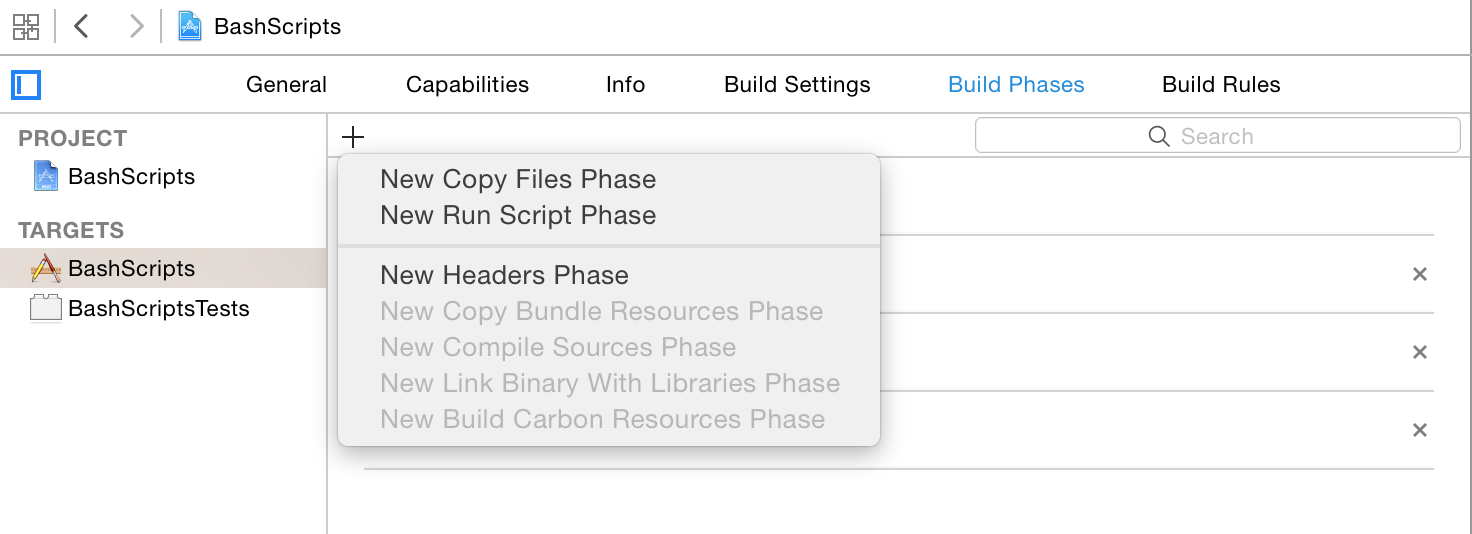
Here comes view called „Report Navigator”, which displays any type of errors, warnings at compile time of Objective-C/Swift, or even while typing new lines of code. Let me show how to use the Report Navigator.
As usual create new Run Script Phase and insert your Bash script:
To keep this blog post short, I’ve created a simple script that checks which build configurations were used:
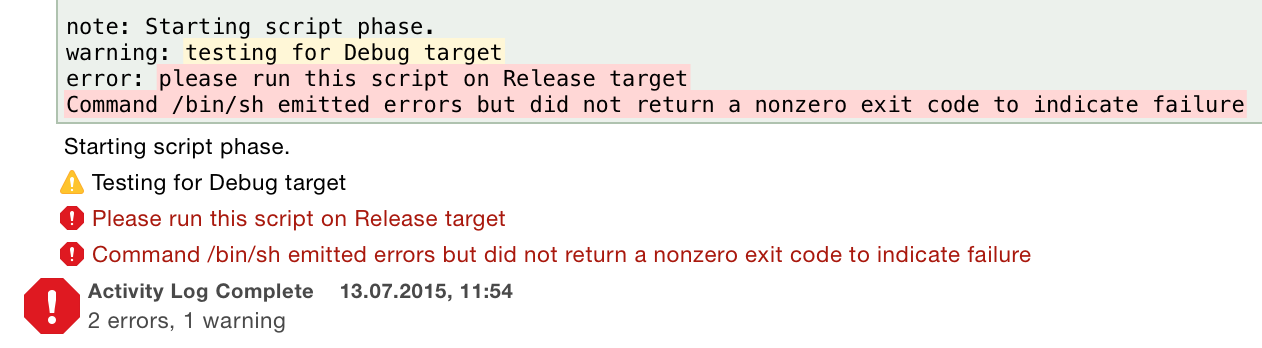
123456789
echo"note: Starting script phase.”echo "warning: testing for Debug target"if [ "Debug"= "${CONFIGURATION}" ];then echo "error: please run this script on Release target"else echo "warning: running on Debug target"fi
Please, take a look in every echo at note:, warning: and error: prefixes. When XCode recognizes any of these tags, the proper indicator will show up in Report Navigator and of course at the top bar:
Pay attention to the colon at the end of each tag. Tags can be placed anywhere in the message.
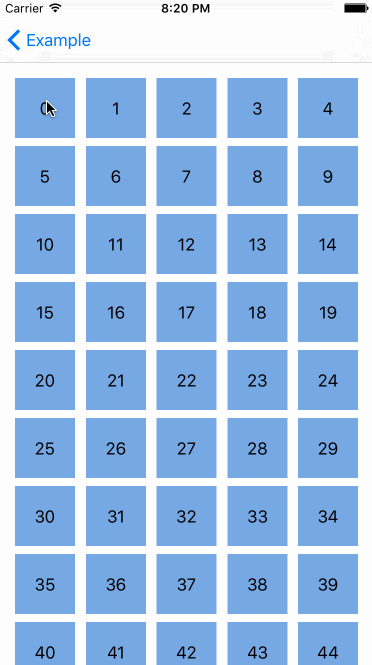
]]><![CDATA[UICollectionViews now have easy reordering]]>2015-07-16T01:30:09+02:00http://nshint.github.io/blog/2015/07/16/uicollectionviews-now-have-easy-reorderingI’m a huge fan of UICollectionView. It’s way more customizable than his older brother UITableView. Nowadays I use collection view even more often than table view. With iOS 9 it supports easy reordering. Before it wasn’t possible out of the box, and to do so means painful work. Let’s have look at the API. You can find the accompanying Xcode project on GitHub.
The easiest way to add easy reordering is to use UICollectionViewController. It now has a new property called installsStandardGestureForInteractiveMovement which adds standard gestures to reorder cells. This property is true by default, which means that there’s only one method we should to override to get things working.
12345
overridefunccollectionView(collectionView:UICollectionView,moveItemAtIndexPathsourceIndexPath:NSIndexPath,toIndexPathdestinationIndexPath:NSIndexPath){// move your data order}
The collection view infers that items can be moved because moveItemAtIndexPath is overrired.
Things go complicated when we want to use a simple UIViewController with collection view. We also need to implement UICollectionViewDataSource methods mentioned above, but we need to rewrite installsStandardGestureForInteractiveMovement. No worries, it’s also easily supported.UILongPressGestureRecognizer is a continuous gesture recognizer and fully supports panning.
We stored selected index path obtained in long press gesture handler and depending on wether it has any value we allow to pan gesture to kick in. Then, we call some new collection view methods accordingly to the gesture state:
beginInteractiveMovementForItemAtIndexPath(indexPath: NSIndexPath) which starts interactive movement for cell at specific index path
updateInteractiveMovementTargetPosition(targetPosition: CGPoint) which updates interactive movement target position during gesture
endInteractiveMovement() which ends interactive movement after you finish pan gesture
cancelInteractiveMovement() which cancels interactive movement
And this makes handling pan gesture obvious.
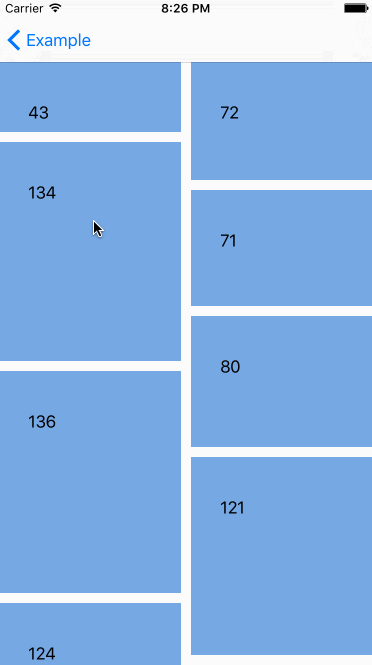
The behavior is the same as with standard UICollectionViewController. Really cool, but what makes it even cooler is that we can apply reordering to collection view with our custom collection view layout. Check interactive movement with simple waterfall layout.
Uhm, looks cool, but what if we don’t want to change cell size during movement? Selected cell size during interactive movement should remain the same. This is possible. UICollectionViewLayout also gets additional methods to handle reordering.
The former is called during the cells interactive movement with target and previous cell’s indexPaths. The next one is similar, but it’s called just after interactive movement ends. With this knowledge we can achieve our requirement using one little trick.
Solution is straightforward. Grab previous and target index paths of currently moving cell. Then call UICollectionViewDataSource method to move this items around.
Without a doubt, a collection view reordering is a fantastic addition. UIKit engineers made awesome job! :)
P.S: I would like to thanks Douglas Hill for hinting out some improvements in our code. Thanks Douglas, keep up the good work!
]]><![CDATA[Shared breakpoints]]>2015-07-12T14:00:40-03:00http://nshint.github.io/blog/2015/07/12/shared-breakpointsDeveloping multithreaded application is not something new and it’s become more and more popular with multicore processors. One thing it’s for sure, debugging multithread applications is tough.
iOS has some gotchas regarding multithread, things that if you don’t respect, may cause your application to crash or hang the users interface, for example:
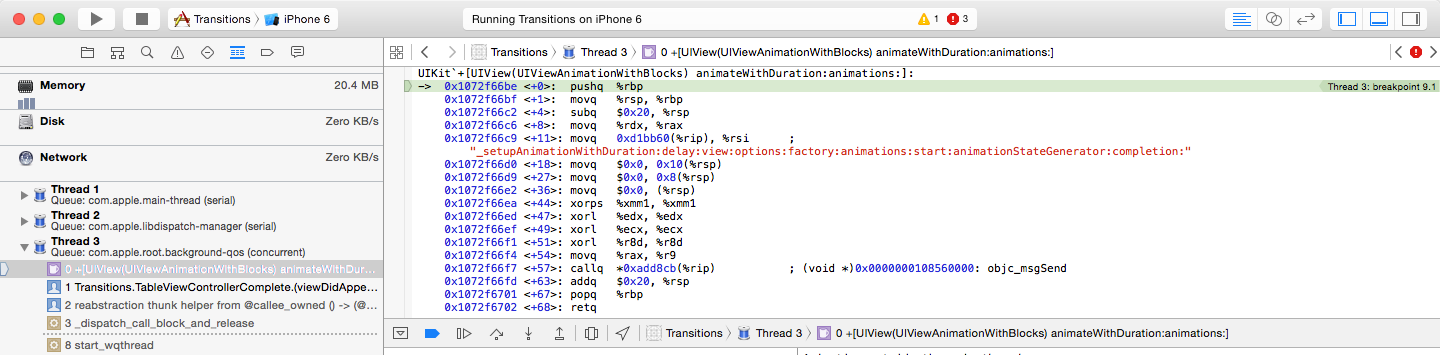
Animations outside the main thread, may crash the application.
Performing network requests on the main thread, will hang the users interface.
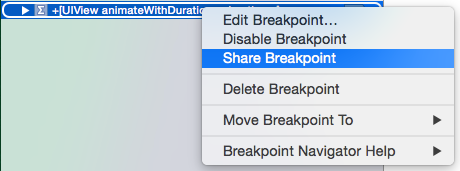
We can solve those situations by using the so called Symbolic Breakpoints and share those breakpoints with your team. Thereby, every developer can take advantage of that, and get notified, when they occur.
To help you out, we created a bunch of shared breakpoints and integrate them into your project is very easy:
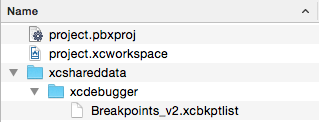
- Go to your .xcodeproj or .xcworkspace file, right click on it, and choose Show Package Contents.
- Open the folder xcshareddata, then xcdebugger (create them if not exists).
- Breakpoints are saved into Breakpoints_v2.xcbkptlist.
- Now you just have to paste the following content into the <Breakpoints> node.
(We could also add those by using LLDB commands, but those won’t show up on the Breakpoints navigator)
Now, whenever the breakpoint conditions are satisfied, you’ll be notified and will have a chance to quickly fix your code, before it crashes into the users hand!


 We can solve those situations by using the so called
 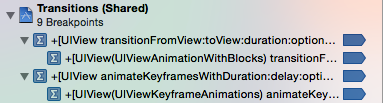 - Go to your