


Swift like objC allow us to mix it with other languages, unfotunately when it comes to Swift we can only choose between our good old friend objC or ANIS C, as there is still lack of C++ support. Basically using function pointers allows us to call C functions inside Swift. Swift will automatically convert methods included in Bridge Header into Swift equivalents:
This code:
1 2 3 | |
Will be converted into:
1 2 3 | |
And as far this is all pretty straightforward so now having our C CoreAudio implementation we can use it in our Swift project like that:
1 2 3 4 5 6 7 8 9 10 11 12 13 14 15 16 17 18 19 20 21 22 23 24 25 26 27 28 29 30 31 32 33 34 35 | |
But because Swift is very strict when it comes to type checks we are no more able to pass our class to InitializeAudioSource function, if you try to do so:
1
| |
You will end up with this error:
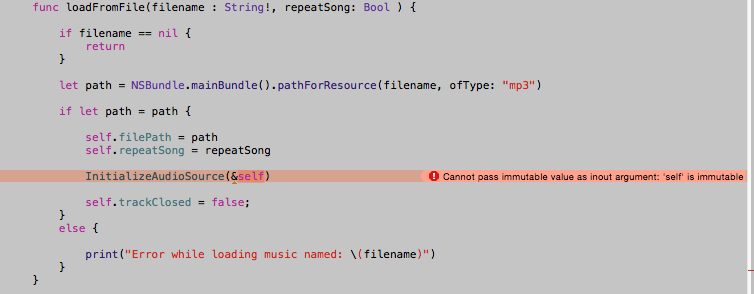
And this is were the bad hacks come in. Unfotunately we need to get a “true” raw pointer to be able to pass it back to C code and to so we need this piece of code:
1 2 3 4 5 6 7 8 | |
And that’s how you pass Swift classes and objects to C code, and you will need to do it every time you need a void or any other fancy pointer on C side.
What happens here is that we first take an Unmanaged version of our class object this tells compiler that we are now responsible for memory management, and stops doing retain release magic under the hood for us. But still this is not enough, now we need a raw memory pointer from that unmanaged object and thats where toOpaque() comes in. This will return an raw C pointer of our class object. This is the true void * pointer.
COpaquePointer is memory representation of something that cannot be represented in Swift so you should be very careful when playing with this kind of pointers. Now we just need to make it a proper type in this case UnsafeMutablePointer with <Void> class type. Every UnsafePointer have constructor that takes COpaquePointer so you have to be sure you are choosing proper type when creating it as there is no type check at this point!
Hopefully on C side it’s easy to convert void pointer to proper class type, you just need to use bridge to do so:
1 2 3 4 5 6 7 8 9 10 11 12 13 14 15 16 | |
I hope this will help people understand a bit more about how danger may be playing with C in Swift and vice versa. Using Unmanaged and COpaquePointer may lead to crashes and memory leaks, as in some cases you are again responsible for manual memory managment, you are able to get raw pointers with no type that can be casted to whatever you want and so on.
Overall this is a powerful magic you can do in Swift but as someone said: “With Great Power Comes Great Responsibility” ;)
Example usage available on github